TMT
poses gallery


editor tips
additional training
&
What our Editors want YOU to know when shooting a TMT Wedding
feedback + advice from the editor's perspective
Equipment
CAMERA - Canon, Nikon, Sony. DSLR or Mirrorless. Must be full-frame. At least 24mp. Dual card cameras are best...write to both cards simultaneously for immediate backup. If the camera does not have two slots, change SD cards frequently to protect against losing all photos in case of SD card corruption.
LENS (Engagement) - 35mm, 85mm or 135mm
LENS (Wedding) - Either a set of 24/35mm, 85mm(with macro) or 135mm. Or for flexibility 12-24, 24-70mm, 70-200mm. (Or something in that range depending on the availability.
FLASH or OCF (Wedding) - Very necessary if indoor. Optional if outdoor.
Settings
MANUAL MODE is best! (Aperture mode is okay...sometimes. But please ensure the shutter speed does not go below the minimum stable speed...depending on the lens and lighting).
WHITE BALANCE - Automatic works well most of the time. But experienced photographers can go manual too. But please don't set it too warm & shoot under yellow light indoors. The result would be a nightmare to edit.
FILE TYPE - RAW, RAW & RAW. Always RAW!
BURST MODE - mostly unnecessary during engagement or weddings, unless it's a bouquet toss or fun shoot with bridesmaids/groomsmen/groom. Please don't burst shoot the first kiss at the ceremony. There are a couple things to consider when it comes to burst mode. Burst mode means many more photos which is more work culling on your side or the editors side. It is also a burden on the camera. High end cameras have a shutter life rated to a million clicks and so using burst mode does add wear and tear on your camera leading to an unwanted expense of buying a new one every year or two. Framing your shot just right and being selective on when you shot is a skill worth mastering. See HELPFUL TIPS below.
BEST OVERALL LENS SETUP - A 24-70 2.8 lens with a combo of 70-200 2.8 or 4.0 lens is a match made in heaven for weddings. 24mm is wide enough for ceremony/reception group shots & 200mm is ideal to shoot from a distance.
SHOOT UNDEREXPOSED - It's always a good idea for photographers to shoot one or two stops lower than perfection (underexpose). It's easier to fix an underexposed photo than an overexposed one. Some newer cameras are exceptional to some extent(making overexposed photos normal), but most cameras don't. All outdoor photos can always be 1-2 stops lower than perfection and still good to edit. That way we can salvage the blue sky too if conditions are right.
VIDEOGRAPHERS - We would prefer that the majority of the videos be shot at 60fps. Talking heads like ceremonies and speeches should be shot at 24fps. We also suggest having 2 camera perspectives during the ceremony rights. 1 camera set at 24fps (for steady shots) and 1 glide camera at 60fps (moving). Also, videographers must have gimbal/stabilizers when doing moving shots to minimize the shakiness of the clips. For a great resource on frame rates check out this video: https://youtu.be/qAVfIQ2G7Io
Helpful Tips
KISSING: Please let the groom kiss the bride while he's holding her. It doesn't look romantic at all when his hands are in the pocket or by the side while kissing his bride.
BOUQUETS: Please let the bride hold the bouquet (if there's one) during bridals & group photos, so her hands don't look empty & since it can also act like a prop, it would be a great addition.
TWO CAMERAS - It's best to shoot with 2 cameras. Just make sure the date/time are synced. One can be for 35-50mm/24-70 for wide-angle & group/normal shots. The other can be 85/135mm or 70-200 for farther shots. Holdfast or ESCAM leather belts would be ideal for such a setup.
ALIGNING YOUR SHOT: Whether engagement or wedding, one thing I've noticed (almost all) photographers do, is NOT aligning their camera to horizon level. It's tilted (not artistically), varying from a few degrees to more than 25-30 degrees in some cases. A nightmare for editing if it's a tight shot with no wiggle room. It's easy to shoot at the correct level, just turn on the grid option in the camera & align it with the leading line/eye levels and you get a properly aligned photo. Align to the floor or a roof beam indoors. Align to the horizon or building line outdoors. Here is a helpful resource dedicated to aligning your shot:
RULE OF THIRDS: Be sure to follow the one-third rule of basic composition and focus the couple in the center of the frame. This is very easy to do in the camera & saves a lot of time editing. The subject should always be aligned with the gridlines or the crossing points. Here is a helpful resource dedicated to the rule of thirds:
CHECK FOR CLUTTER: Removing clutter or other background distractions is important. Sometimes just changing your camera orientation can fix this. Other times it's worth changing your angle or even removing the clutter. Here is a link you might find helpful:
10 questions to ask yourself before clicking the shutter
1. What story am I telling?
2. What is the visual focal point of this shot?
3. What competing focal points are there?
4. What is in the background and foreground?
5. Am I close enough?
6. What is the main source of light?
7. Is my Framing Straight?
8. What other perspectives could I capture this subject from?
9. How would holding the camera in the other format change this shot?
10. How will the eye travel through this image?
Engagements
GET CREATIVE: This is a really fun shoot that is mostly relaxed and so it's an ideal time to get creative. Help the couple enjoy being with each other. Music helps! Joke around. Have them do what is natural to them. Get a variety of shots...looking at the camera, looking at each other, kissing, holding hands, walking, twirling, close-ups, farther away.
PRACTICE POSING: Most people need help with posing! It's also a good idea to download some creative posing photos to your mobile and check with the couple if they're comfortable posing that way. If the couple are shy/cold, you can pose them generally and try different angles to shoot (please no burst mode). You can get creative by posing them next to flowers, tall grass and using them as the foreground to add color to the photo. Remember to always shoot sharp (f2.8-4) and focus on the eyes.
BOND: This is a great time to bond with the couple to help the wedding day go more smoothly.
PREFERRED APERTURE:
-
4-5.6 for 70mm onwards
-
2.8-4 for less than 70mm.
-
1.8 for close up shots or late evening shots


typical wedding day shots
Wedding Photography Lighting Tips, From Preparation to Reception
https://petapixel.com/2018/02/03/wedding-photography-lighting-tips-preparation-reception/
Getting Ready
LENS: 35 or 50mm
APERTURE: f2.8-4
INDOOR NOTES: Since in most cases you are indoors and dealing with a group of people, the preferred lens is 35 or 50mm. f2.8-4 aperture. OCF if necessary. When indoors, keep your 24mm-50mm lenses/24-70 lens ready for the shoot, with flash or OCF.
MIRROR REFLECTIONS: While hair and make-up are getting done, take a shot pointing towards the mirror with you standing behind the bride.
THE DRESS: Don't forget to get a shot of the dress on the hanger! Backlit in a window is beautiful or outdoors is awesome too. Also, get the mother or close friend buttoning up the back of the dress once the bride puts it on.
JEWELRY: Closeups of the bride putting on a special piece of jewelry.
AFTER MAKE-UP: After the bride is mostly ready, try to pose her next to the window/ambient light. You can shoot backlit or from the side.
OUTSIDE: If there is time, take everyone outside and have the bridesmaids "fuss" with the bride's dress and veil for a fun getting ready shot.
THE GROOM: The groom & groomsmen are usually stiff while posing, so it would be ideal to lighten their mood before the shoot. These shots are great done outdoors. Have them straighten their tie, lace up shoes, and put on their jackets.


Detail Shots
Great detail shots up the professionalism and appeal of any wedding album. As usual, lighting is key. Outdoor is a great option or close to a window.
LENS: 35 or 50mm, generally
APERTURE: f1.8-2.8 for close-up shots and capturing details (rings, shoes, etc).
BACKGROUND: Consider bringing a pretty platter or fabric (neutral)-covered board to arrange details on. You can also find great backgrounds outside like cobblestone paths.


.jpg)

_Lawrence0027.jpg)
First Look/Touch
The goal is to capture emotions while maintaining the intimacy of the moment. Try to isolate the couple or father-daughter from the background, so the attention isn't diverted
LENS: 85-135mm or 70-200mm
APERTURE: f2.8-4 preferred. Outdoor preferred.


Ceremony
Assess the level of light available. Every ceremony is so different. Use manual settings to best adjust for low light conditions so the final photo is not too noisy or grainy. Some churches and venues have very little light. OCF would be ideal for these.
LENS: 70-200mm or 135mm
APERTURE: 2.8-5.6 preferred.
PROCESSIONAL: Try to avoid including the sitting guests in the frame or confine them to the edge of the frame. While kids are marching, shooting at eye level by sitting down would be ideal.
BE PREPARED: Since there are restrictions in some venues/churches as to where the photographer can place him/herself, please identify ideal locations to shoot beforehand. If possible, remind officiant to move out of the first kiss shot. Anticipate the next event and prepare your lens accordingly.
VARIETY: It would easily become boring to see burst shots of a couple holding hands or the priest/officiant's sermon/speech or the couple kissing. Instead, focus on the guests for their reaction, especially the parents, siblings. Capturing young kids' reactions could be fun since they get easily bored and are looking for any attention. Try and shoot different angles if possible (when permitted to move around) of the same event. Also a good idea to shoot wide-angle, closer shots, long lens shots during this time, so each photo looks different.

.jpg)


Family & Bridal Party Group Shots
Avoid shooting indoors unless there is no other choice. If the couple wants "altar shots," go ahead and get them, but also encourage photos to be taken outside with those same family and bridal party members.
LENS: 50mm or 24-70mm
APERTURE: f4-8.0 depending on the lighting. Avoid too low of aperture on shots involving a lot of people at different depths from the camera.
TAKE CHARGE: This is your time to really take control of the situation and help everyone know where to stand and how to pose to make for a great group photos. Talking to the client ahead of time about family/group shots is so important. You should have a list to work off of, and the client should have appointed someone who knows who is who to direct traffic.
BRIDAL PARTY: Make sure to get a variety of shots here. All different combinations. Walking shots are great where the bride and groom are out in front a little bit. Have the bride and groom kiss while everyone else cheers. Get individual shots with each bridesmaid with the bride and each groomsman with the groom.


.jpg)
.jpg)
.jpg)

Bride & Groom Portraits
LENS: 50 or 85mm/70-200
APERTURE: 2.8-4 preferred.
POSING: Again, some creative shots downloaded to your mobile shown during the couple posing would be a good idea. Apart from the formal photo shoot of holding hands, light kisses (pouting during kissing isn't romantic on photo, so no heavy kissing), walking poses, etc. Try to make use of the surroundings to bring in more color and interest to the photo. Focus the camera to the eye. Always shoot at eye level not from below, it makes the subject(s) look bigger than usual. If it's sunset but not golden hour, don't shoot the couple under direct sunlight. Ensure not to shoot backlit shots in bright light. Avoid shooting indoors unless there is no other choice, even then, using a 20-35mm lens isn't ideal. Better to shoot with 50mm or higher. Remember to pose the couple with their rings.

.jpg)


Sunset Photos
SHOOTING DURING SUNSET: There are a few different ways of shooting a photo while keeping both the background and the foreground/subject properly lit. I've listed out a few below with examples and links for further understanding.
1. HDR or High Dynamic Range Photography
2. Variable ND Filter photography
3. HSS or High-Speed Sync Flash Photography
While Variable ND Filter is inexpensive(starts at $20 till $100s for branded ones), HSS Flashes can be expensive ($200-$500 or more) and HDR Photography is a built-in feature in most new cameras including smartphones.
HDR Photography -
HDR or High Dynamic Range Photography is a post-processing technique that uses multiple images of the same scene shot at different shutter speeds to combine them all into a single photograph. The result is an image with the most amount of detail in both shadow and bright areas of the image, close to what the human eye would see. Although it is ideal to use multiple images of the same scene, you could also create an HDR image from a single image, as long as it is shot in RAW format. (Read further - https://photographylife.com/hdr-photography-tutorial)
BEFORE:


AFTER:
Variable ND Filter Photography - (Also good for videography)
Also see Graduated Neutral Density Filter (Read - https://digital-photography-school.com/using-graduated-neutral-density-filters-for-landscape-photography/)
A variable ND filter is a small piece of glass filter mounted in front of your camera, which enables you to slow down the shutter speed to create amazing long-exposure effects. These include creating milky seas and skies, erasing moving people from an urban scene and creating dramatic light trails. (Read further - https://www.photographytalk.com/how-does-a-variable-nd-filter-work
Also - https://mastinlabs.com/blogs/photoism/what-is-a-graduated-neutral-density-filter)
HSS or High Speed Sync Flash Photography -
This technique allows photographers to use a camera's flash at shutter speeds faster than the camera's maximum sync speed. It's particularly useful in situations where a wide aperture is needed in bright light or when freezing fast-moving subjects. HSS photography is commonly used in outdoor portrait photography and other scenarios where controlling ambient light while using flash is crucial. (Read further - https://www.slrlounge.com/glossary/high-speed-sync-hss/
and
https://digital-photography-school.com/portraits-using-flash-high-speed-sync/)

Here is a beautiful engagement session album shot by one of our photographers (Liz Russell) showing great usage of High speed sync (HSS) flash thereby keeping both the background & the couple properly lit.
https://tmtweddings21.pixieset.com/camrynandbradengagement/
Reception
Most receptions are indoor and lack ambient light. There are also unpredictable types of lighting: disco, LED, Laser lights. Better to have a couple of flashes or an OCF setup. Please always use Flash or OCF unless the venue is extremely well lit.
LENS: 85-135mm & 70-200 during party/dance so guests can be isolated & they don't look scattered
APERTURE: 2.5-4 with OCF preferred
ISO: Never raise the camera ISO more than 3200 even if it's capable of shooting at 20,000 ISO. The photos look digitally noisy and wouldn't be appealing. Try using diffusers or bounce from the roof so the flash doesn't create strong light on the face/body.
FOCUS OF LIGHTING: It would also help to request the DJ/Light operator to not focus the LED/laser lighting on the couple/subject during important events. Preferably 50mm/24-70 for important events (cake cutting, couple dance etc.)
IMPORTANT EVENTS: Use a longer lens or aperture wide open during important events like couple dance & other dances, cake cutting, sparkler exit, etc. Isolate your couple/subject from the surrounding during the party so the photo doesn't look messy. Avoid shooting the back-side, not appealing. New trend of slo-mo (slow sync rear curtain flash) isn't appealing if not done right. Not all couples may like it.


.jpg)


.jpg)
Some useful tips regarding light bouncing, especially at indoor receptions
~ How to Bounce Flash Wedding Receptions and Events
https://www.youtube.com/watch?v=HGEDhnHIBio
~ 10 Tips For Wedding Reception Lighting
https://www.slrlounge.com/10-lighting-tips-wedding-receptions/
example photo albums
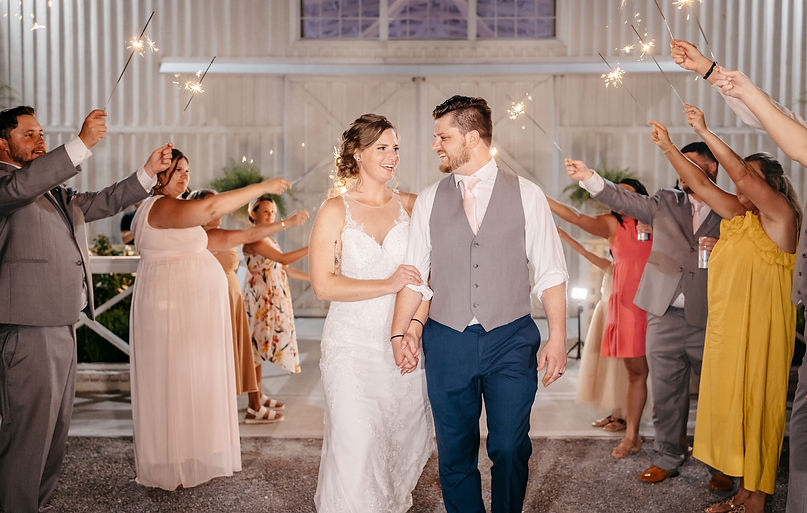
Exit Shots
SPARKLER EXITS:
For the Photographer, to get great, non grainy shots from a sparkler exit it's just a matter of reducing the ISO and shooting with a flash/ shoot with higher ISO(3200-4000) and asking the couple to take it slow. The same is applicable to fireworks shoot also, minus the flash usage. Below is a helpful link:
For the Videographer, use continuous light to illuminate the couple and gimbal to steady the video, wider lens to ensure the guests and the sparklers are in view. If continuous light is not available, raising the ISO slightly would help but will lead to visible noise. For a more effective video, a slightly darker background with no distracting lights would be good. But you'll need to discuss this with the couple. You could even do a Dolly Zoom effect for fun and would look great on the teaser.
.jpg)
.jpg)
.jpg)


Click on the photo below to see a perfectly shot album. This one made the editor's job easy.

please review this information
before shooting a wedding or other session to ensure you are able to shoot consistent with our style!
Thank you for being a part of TMT Weddings!

